How to Setup VPN on GL.iNet WiFi Router?
The GL.iNet router is a popular networking device known for its portability. This router offers a variety of features that enhance the router’s performance. This device also has an in-built VPN, you just need to execute the GL.iNet router VPN setup. Enabling VPN on your GL.iNet router can prove to be really beneficial. The VPN provides better security, network privacy, protection on public WiFi, and several other benefits. Thus, you must know the procedure for the GL.iNet VPN setup.
The GL.iNet router supports various VPNs from which you can enable anyone. If you wish to know about the GL.iNet VPN server setup, worry not. We are here with this post to assist users with the GL iNet VPN setup. Then, we will talk about the issues you could face with the VPN and their causes. Afterward, we’ll cover the methods you can use to fix the issue.
Which VPN Services Can You Use With the GL.iNet Router?
The GL.iNet router supports numerous VPN services. You can use either one of these VPN services by setting them up correctly. The router works with the following VPN services:


These are the VPN services that you can use with your GL.iNet router. You just need to know the proper procedure for the GLi.Net VPN setup.
Steps for the GL.iNet Router VPN Setup
In this section, we will explain the steps for the GL.iNet VPN server procedure. We’ll explain the procedure for the OpenVPN client, OpenVPN server, WireGuard client, and WireGuard Server VPNs. To enable VPN on your router, you must follow the below instructions:
OpenVPN Client GL iNet VPN Setup
- Initially, link your device to the router’s network to access the GL.iNet router login page.
- Now, from that device, go to a web browser, and use the IP address in the address bar.
- When the login page appears, with the login credentials access the user interface.
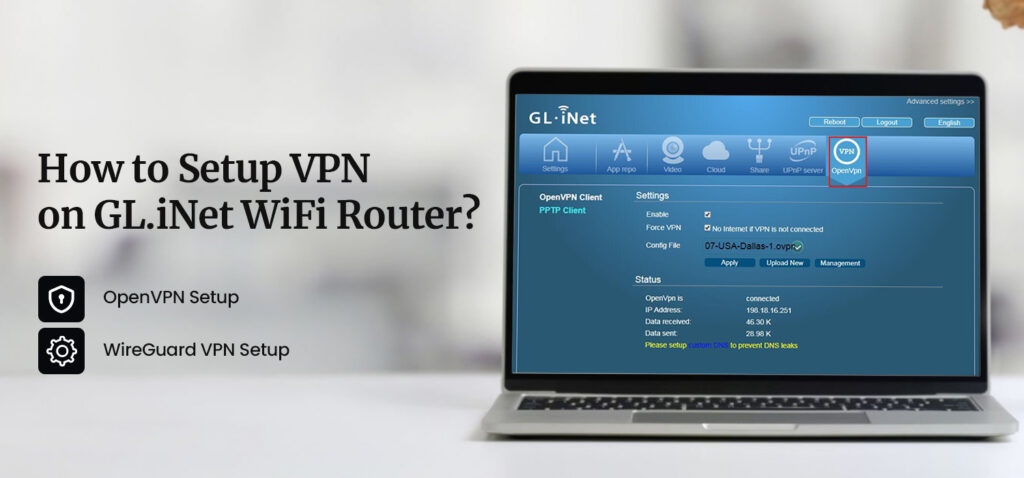
- Hereon, from the home page, go to VPN and select the OpenVPN Client option.
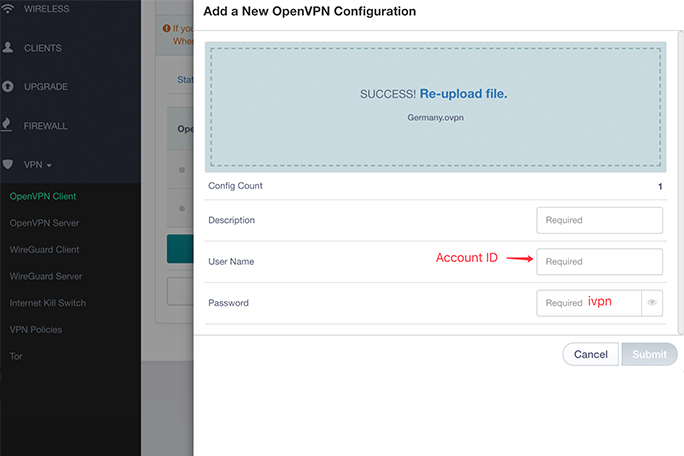
- From here, click the Add a New OpenVPN Configuration option.
- After that, you must upload the configuration files you installed.
- You need to get the configuration files from your Internet Service Provider (ISP).
- Finally, you need to enter a description of the configuration and tap Submit.
- It can even ask you to enter a username and password.
- You can obtain the username and password from the ISP, so reach out to them.
OpenVPN Server VPN Setup
- Firstly, log into the router’s user interface using the IP address and login details.
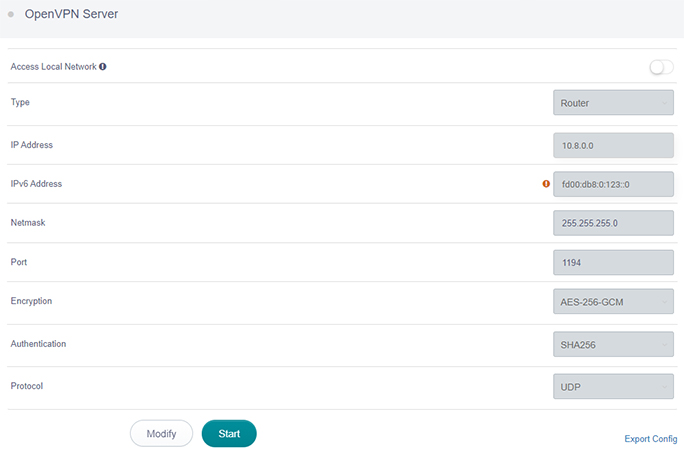
- Now, from the web interface, go to VPN, and select OpenVPN.
- Hereon, click Generate a Configuration File and configure the file accordingly.
- When you are done with configuring the files, you must export them.
- Following this, you must click Start to start the OpenVPN Server.
- In the end, you can start using the OpenVPN server correctly.
- Remember, you can’t use the OpenVPN Server and OpenVPN Client at the same time.
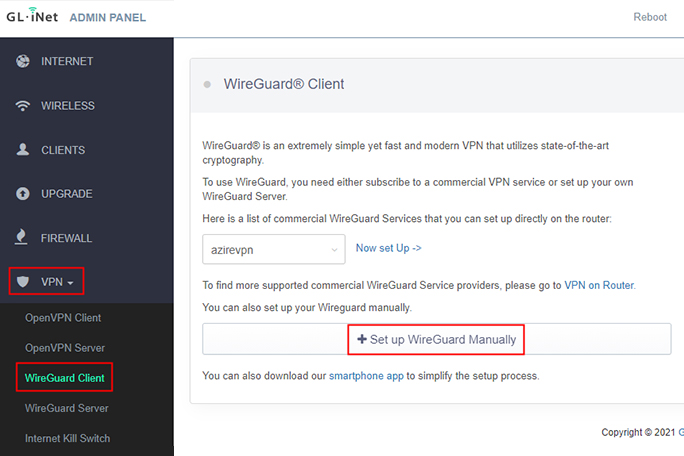
WireGuard Client GL iNet VPN Setup
- To begin with, open the admin panel of the router and go to the WireGuard Client.
- You need to buy the WireGuard Client from a service provider.
- In the WireGuard Client VPN, you can set up various service providers VPN.
- Hereon, on the WireGuard Client page, select the VPN and click the Now Set up option.
- You need to enter the correct username and password.
- Now, you will receive configurations, it will take some time.
- After that, you can set up the different VPNs from this page.
- Lastly, you can start using the VPNs accordingly.
WireGuard Server VPN Setup
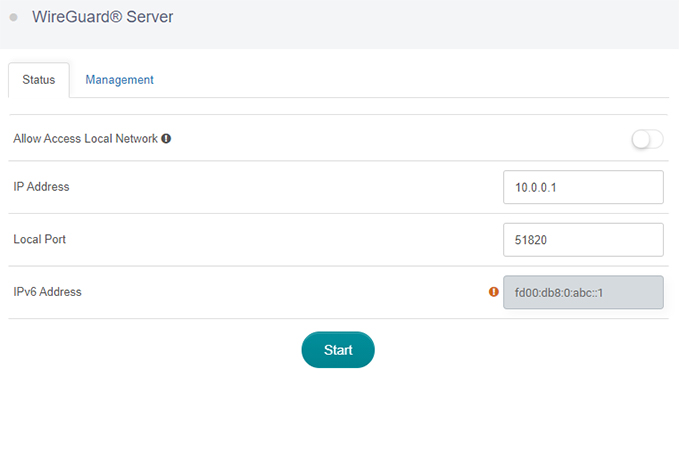
- Primarily, log into the router’s user interface using the login credentials.
- Now, from the home page, go to VPN and select the WireGuard Server option.
- Hereon, tap the Initialize WireGuard Server and then use the default parameters.
- You can set your own values as well and click Start to start the WireGuard Server.
- After that, you can add a new client to the server and configure the correctly.
- At last, you can get the configuration for the clients you set up.
These are the steps for the GL.iNet VPN server setup. Now, you can start using the VPN correctly. If the router’s not working after VPN, keep reading ahead.
Why is the Internet Not Working After GL.iNet VPN Setup on GL iNet Router?
Sometimes, due to some reason, you are unable to use the internet after the GL.iNet router VPN setup. Some common reasons for this issue are as follows:
Oversized Zip Files
Wrong Configuration Files
Another VPN is Working
Incorrect Username and Password
These are some common factors responsible for the internet not working after the GL.iNet VPN setup.
Troubleshooting the GL iNet VPN Setup Issues
Now that you know the factors responsible for the issues, we can troubleshoot them effectively. You must fix these problems to use the VPN accurately. Some useful troubleshooting methods are as follows:
Use Correct Sized Zip Files
While uploading the configuration files, you need to ensure the files aren’t too huge. If the files are too huge, they will have trouble uploading. That’s why it’s crucial to upload the files as zip files. But if the zip files are too big, it will have difficulty. Now the GL.iNet VPN setup issues should be fixed and you can set them up again.
Upload the Correct Files
When you upload the zip files, you must ensure to upload the correct configuration files. Otherwise, you will face several issues. You need to obtain the configuration files from your ISP. They could have sent the wrong files. In this case, you must contact them and ask them to send the correct files.
Use Correct Username & Password
Another reason could be, sometimes, it also asks for a username and password to use. Thus, you must use the correct username and password only. Otherwise, you can not enable the VPN correctly. The username and password are received from the ISP only. You can try again with the GL.iNet VPN server setup.
Disable Other VPNs
If any other VPN or server is enabled and you are trying to enable another VPN, it won’t work. Thus, check if any other VPN is on. If it is, you can disable it and then try again with the GL iNet VPN setup.
These are the troubleshooting methods you can use to fix the GL.iNet router VPN setup. Now, the issues you were facing should be gone with your VPN. We hope you understand the procedure to set up VPN on your router. If there’s anything else you require assistance with, you can connect with our team.
FAQs
Can I Run VPN Client and Server at the Same Time?
Yes, you can run the VPN client and server at the same time on the GL.inet router. However, you need to have the 4.1.1 firmware. Otherwise, the client and the server will not work together. Thus, you must upgrade the firmware from the web interface.
What is the Internet Kill Switch for GL.iNet Router?
In the internet kill switch, you must run the VPN client all the time. If none of the VPN clients are running, the clients can’t access the internet. Thus, you must use this feature carefully. This feature is available on 3.100.
How to Get Configuration Files For VPN Setup?
To get the configuration files for the VPN setup, you need to go to the official website of GL.iNet. From their website, go to the Servers page. On this page, you can find the OpenVPN configuration files. From this page, select the server’s location and download the configuration files.